
How to Build a Bee House: A Step-by-Step Guide for Your Garden
Table of Contents
Supporting local pollinators is one of the most rewarding things you can do for your outdoor space. While honeybees get plenty of attention, solitary bees—such as mason bees and leafcutter bees—are our most prolific garden pollinators. Unlike honeybees, they don’t live in hives or produce honey; instead, individual females build private nests in hollow stems or wooden cavities.
Building a DIY bee house is a simple, budget-friendly weekend project that provides a safe haven for these gentle, non-aggressive garden helpers.
Why Solitary Bees Need Our Help
Habitat loss and urban development have severely reduced natural nesting sites for wild pollinators. By setting up a solitary bee hotel in your yard, garden, or even on a sunny apartment balcony, you give them a secure place to lay their eggs, ensuring a thriving population of pollinators for your fruit trees, vegetables, and flowers.
Step-by-Step Construction Guide
Step 1: Gather Your Materials and Tools
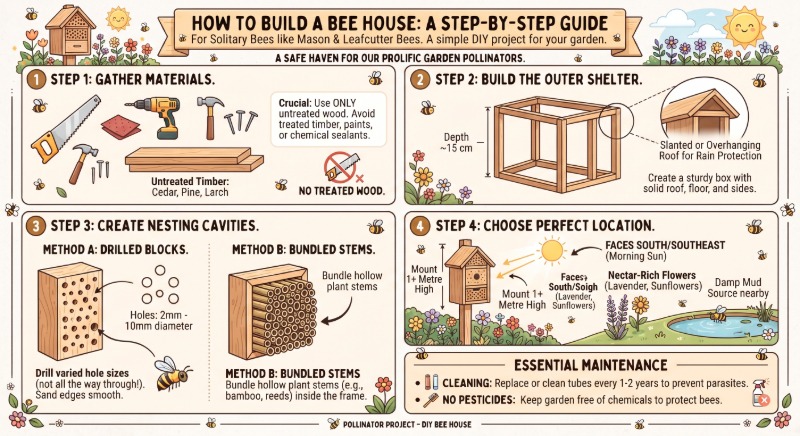
To build a safe, durable bee house, you will need untreated timber (such as cedar, pine, or larch), a hand saw, a power drill with assorted drill bits, sandpaper, and a sturdy mounting bracket.
- Crucial Rule: Never use treated wood, paints, or chemical sealants, as these release toxins that can easily kill developing bee larvae.
- Avoid plastic straws or open tin cans, which trap dangerous moisture and mold.
Step 2: Build the Outer Shelter Frame
Cut your untreated timber to form a simple wooden box with a solid roof, floor, and side panels. A standard depth of about 15 cm is ideal to protect the nesting tunnels from wind, rain, and predatory birds.
Make sure the roof has a slight downward slant or overhangs the front opening by at least a few centimeters to shed rainwater away from the nesting tubes.
Step 3: Create and Install the Tubes
You can fill your outer frame using two beginner-friendly methods:
- Drilled Wood Blocks: Take a solid block of untreated hardwood and drill holes ranging from 2mm to 10mm in diameter to accommodate different bee species. Note: Never drill all the way through; blind holes (closed at the back) are required.
- Bundled Natural Stems: Alternatively, bundle hollow plant stems like bamboo, elder, or reed grass tightly inside the frame.
Sand the edges of any drilled holes smooth to prevent delicate bee wings from tearing.
Step 4: Choose the Perfect Location
Location is everything when setting up your bee house. Mount the structure securely to a sturdy wall, fence post, or tree at least 1 metre off the ground to keep it safe from ground moisture and predators.
- Position it facing south or southeast so the nesting chambers catch the morning sun, waking the cold-blooded insects up for foraging.
- Place it near nectar-rich flowering plants and a source of damp mud or clay (used by mason bees to seal their nests).
Essential Maintenance Tips for Long-Term Success
A common mistake gardeners make is setting up a bee house and forgetting about it for years. Left uncleaned, old nests can accumulate parasitic mites and mold.
- The Two-Year Rule: If using removable cardboard inserts or paper straws inside your drilled holes, you can gently harvest cocoons in late autumn and clean the house.
- Avoid Chemicals: Never use pesticides or insecticides anywhere near your bee house or surrounding garden flowers.
 Why I built this website


